Leather Care Guides
How to Fix Scratches and Marks on Leather: A Simple Guide
Nov
Introduction
Leather is a luxurious material found in furniture, clothing, shoes, and accessories. However, it is also prone to scratches and marks. Instead of replacing scratched leather items, learning a few simple techniques can help restore them to their former glory. Here’s a comprehensive guide to help you fix those unsightly scratches and marks on your leather goods.

Table of Contents:
- Understanding Leather and Its Types
- Common Causes of Scratches on Leather
- Assessing the Damage
- Basic Tools and Materials Needed
- Quick Fixes for Minor Scratches
- DIY Home Remedies for Shallow Scratches
- Fixing Deeper Scratches and Scuffs
- Using a Leather Repair Kit: Step-by-Step Guide
- How to Handle Marks from Ink or Stains
- Preventive Measures to Avoid Future Scratches
- When to Seek Professional Help
- Maintaining Leather Long-Term
- Conclusion
- Frequently Asked Questions
Understanding Leather and Its Types
Not all leather is created equal. It’s crucial to know what type of leather you’re dealing with before attempting any repairs.
Genuine Leather vs. Synthetic Leather
Genuine leather is made from real animal hides and offers natural durability and softness. Synthetic leather, on the other hand, mimics the look of real leather but is made from plastic-based materials like polyurethane. Repair methods for genuine leather often differ from those used for synthetic versions.
Aniline, Semi-Aniline, and Pigmented Leather Explained
- Aniline Leather: This type of leather has no protective coating, making it more susceptible to scratches but very soft and luxurious.
- Semi-Aniline Leather: This has a slight protective finish, offering a balance between softness and durability.
- Pigmented Leather: This is the most durable type, often used in car seats and sofas. It has a strong protective layer, making it more resistant to scratches.
Understanding your leather type helps in selecting the correct repair method and products.
Common Causes of Scratches on Leather
Leather can be damaged by various factors. Knowing what caused the scratches can help in both repair and prevention.
Pets and Sharp Objects
Pets, especially cats and dogs, can scratch leather with their claws. Additionally, sharp objects like keys, pens, or jewelry can easily leave marks.
Improper Handling and Storage
Throwing leather bags on rough surfaces or placing them in crowded spaces can result in scratches. Proper handling and storage are key to preventing these issues.
Environmental Factors
Exposure to direct sunlight, humidity, or extreme temperatures can make leather brittle, increasing the risk of scratches and cracks.
Assessing the Damage
Before you dive into fixing your leather item, it’s essential to assess the damage.
Superficial Scratches vs. Deep Marks
- Superficial Scratches: These are light surface scratches that haven’t penetrated deep into the leather. They are often white or light in color and can usually be fixed with simple treatments.
- Deep Marks: These are more severe, sometimes cutting through the leather’s surface. They may require a more detailed repair process using fillers and dyes.
Take a close look at the scratch under good lighting to determine its depth.
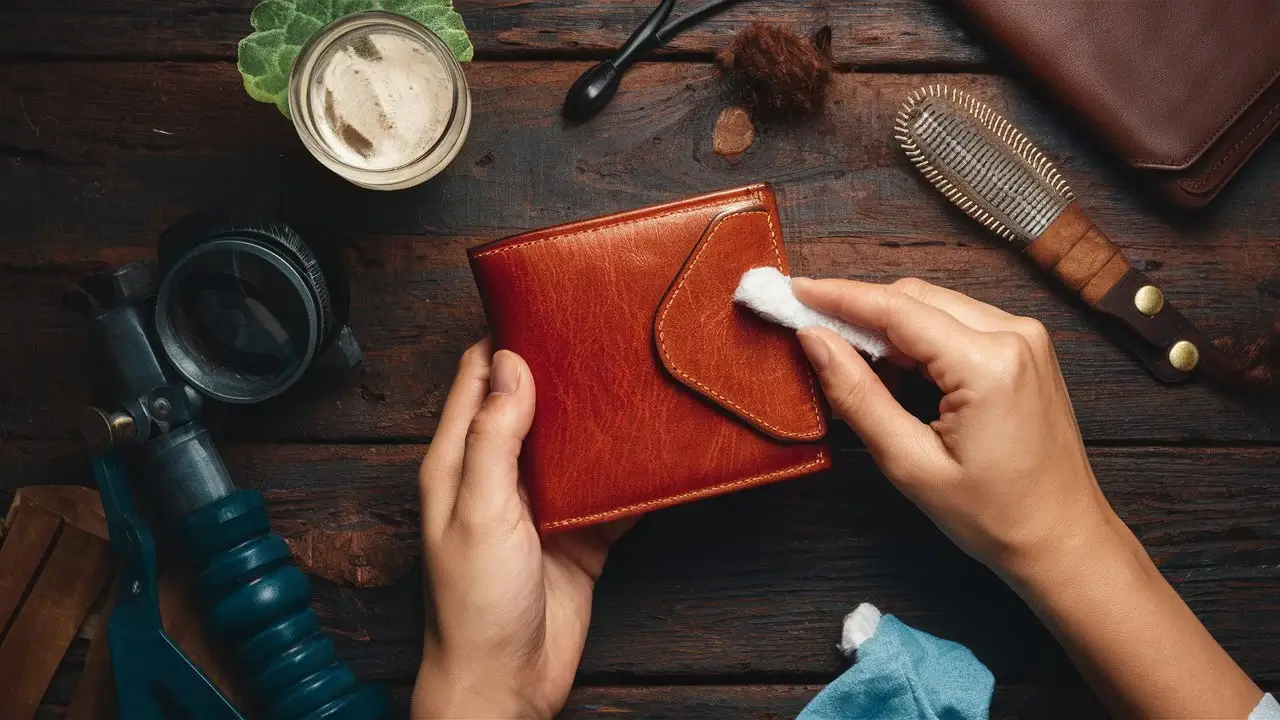
Basic Tools and Materials Needed
Having the right tools makes the repair process smoother and more effective.
Essential Tools for Leather Repair
- Leather Conditioner: Restores moisture and helps blend scratches.
- Olive Oil or Coconut Oil: Common household items that can help hide minor scratches.
- Beeswax: Helps to seal and protect the leather surface.
- Leather Repair Kit: Includes fillers, dyes, and other tools for fixing deeper scratches.
- Soft Cloth and Applicator Sponge: For applying oils, conditioners, or dyes.
- Heat Gun or Hair Dryer: Helps in setting the repair materials.
Quick Fixes for Minor Scratches
For minor surface scratches, quick home remedies can often do the trick.
Using Olive Oil or Coconut Oil
- Dab a small amount of olive or coconut oil onto a soft cloth.
- Gently rub the oil into the scratch in a circular motion.
- Let it sit for 10-15 minutes, then wipe off any excess oil.
- Repeat if necessary until the scratch is less visible.
This method works well for shallow scratches on most types of genuine leather.
Applying a Leather Conditioner
Leather conditioner helps replenish the oils that keep leather supple. Apply it using a soft cloth, working it into the scratch to restore the leather’s natural texture and color.
DIY Home Remedies for Shallow Scratches
Several household items can help fix small scratches without needing specialized products.
Using Baking Soda and Toothpaste
- Mix a small amount of baking soda with toothpaste.
- Apply the mixture to the scratch using a soft cloth.
- Rub gently in a circular motion.
- Wipe off the residue with a damp cloth and allow it to dry.
This method helps to buff out the scratch, making it less noticeable.
Fixing Deeper Scratches and Scuffs
When dealing with deeper scratches and scuffs, you may need to go beyond simple home remedies and use specialized leather repair products. Deeper scratches often require filling, dyeing, and more intensive treatment to restore the surface.
Leather Fillers and Dyes
Leather fillers are specifically designed to fill in the gaps created by deeper scratches. These fillers, when used correctly, blend seamlessly with the leather’s surface, making the damage almost invisible.
Step-by-Step Process for Applying Leather Filler
- Clean the Area: Use a leather cleaner or a mild soap solution to thoroughly clean the affected area. Ensure there is no dirt or oil residue left behind, as this could affect the adhesion of the filler.
- Apply the Filler: Using a small spatula or applicator, apply a thin layer of leather filler to the scratch. Be sure to press the filler into the scratch to fill it completely.
- Smooth the Surface: Use the edge of the spatula to smooth out the filler so that it is level with the leather surface. Allow it to dry according to the product instructions.
- Sand the Area: Once the filler has dried, use a fine-grit sandpaper to gently smooth out the area. This will help blend the repair with the surrounding leather.
- Dye the Leather: If the repaired area appears lighter than the rest of the leather, use a leather dye that matches the color of your item. Apply it carefully and let it dry fully before using the item.
This method works well for deeper scratches that penetrate through the leather’s surface, providing a professional-looking repair.
Using a Leather Repair Kit: Step-by-Step Guide
Leather repair kits are a great solution for fixing both superficial and deep scratches. They usually come with all the necessary tools and instructions for a complete DIY repair.
Choosing the Right Kit for Your Leather Type
When purchasing a leather repair kit, make sure it is suitable for your leather type (genuine, synthetic, aniline, etc.). Most kits include:
- Leather filler
- Color matching dyes
- Applicator tools
- Protective finish
Application Process for Best Results
- Test the Product: Always test the repair products on a small, inconspicuous area to ensure they do not damage or discolor your leather.
- Apply the Filler: Use the included applicator to apply a thin layer of filler to the scratch or scuff. Smooth it out with a spatula.
- Color Match with Dye: Mix the dye according to the instructions, matching it to the color of your leather item. Apply it carefully with the applicator sponge.
- Seal with a Finish: Once the dye has dried, apply a protective finish to seal the repair. This helps prevent future damage and enhances the appearance of the leather.
Using a repair kit can yield professional-quality results, making it a worthwhile investment for valuable leather items.
How to Handle Marks from Ink or Stains
Ink stains are a common issue, especially on leather bags, jackets, and furniture. The key to removing ink marks is to act quickly before the stain sets.
Removing Ink Marks with Rubbing Alcohol
- Dampen a Cotton Swab: Moisten a cotton swab with rubbing alcohol, making sure it’s not dripping wet.
- Blot the Ink Stain: Gently dab the ink stain with the swab, being careful not to rub, as this could spread the ink.
- Wipe with a Damp Cloth: Use a clean, damp cloth to wipe away any residue. Let the area dry completely.
- Apply Leather Conditioner: Finish by applying a leather conditioner to restore moisture and protect the leather.
Using Nail Polish Remover for Stubborn Stains
Nail polish remover can be effective for tougher stains, but use it sparingly and with caution.
- Apply a small amount of non-acetone nail polish remover to a cotton swab.
- Gently dab the stain, taking care not to over-wet the area.
- Clean with a damp cloth and apply conditioner afterward.
This method is best for small, localized stains and should be used only if other options fail.
Preventive Measures to Avoid Future Scratches
Preventing scratches and marks is much easier than fixing them. With regular care and some preventive steps, you can keep your leather items looking new.
Regular Maintenance and Conditioning
Leather naturally loses its oils over time, making it more prone to scratches and cracking. Regular conditioning helps maintain its flexibility and durability.
- Condition Every 3-6 Months: Apply a high-quality leather conditioner every few months, depending on usage and exposure.
- Use a Soft Cloth: Always use a soft, lint-free cloth to apply the conditioner, rubbing it in gently with circular motions.
Proper Storage and Handling
Storing your leather items correctly can also prevent scratches and marks.
- Keep Away from Direct Sunlight: Sunlight can dry out leather, making it more susceptible to scratches.
- Avoid Overstuffing Bags: Overfilling leather bags can stretch the material, leading to surface damage.
- Use Dust Covers: When not in use, store leather items in a dust cover or soft cloth bag to protect them from accidental scratches.
When to Seek Professional Help
While many scratches and marks can be fixed at home, some cases may require professional intervention.
Understanding When DIY Isn’t Enough
If the scratch is too deep, covers a large area, or if your repair attempts have not been successful, it might be time to consult a professional leather repair service. They have specialized tools and techniques to handle complex repairs.
Costs and Benefits of Professional Leather Repair Services
Professional repair can be costly, but it may be worth it for high-end leather items or extensive damage. Repairs typically range from $50 to $200, depending on the severity of the damage and the type of leather.
Maintaining Leather Long-Term
Consistency is key when it comes to leather care. By following a regular maintenance routine, you can extend the life of your leather items.
Tips for Regular Cleaning and Conditioning
- Dust Regularly: Use a soft, dry cloth to dust leather items weekly.
- Condition After Cleaning: Always follow cleaning with conditioning to replenish lost oils.
- Use Leather Protection Sprays: Apply a leather protector spray to shield your items from spills and stains.
These simple habits can go a long way in keeping your leather looking pristine.
Conclusion
Fixing scratches and marks on leather doesn’t have to be a daunting task. With the right knowledge and tools, you can easily restore your leather items to their original condition. Regular maintenance and proper handling are essential for keeping your leather looking its best. Remember, a little care goes a long way in preserving the beauty and longevity of your leather goods.
Frequently Asked Questions
1. Can you fix scratches on leather yourself?
Yes, minor scratches can be fixed at home using oils, conditioners, or leather repair kits. For deeper scratches, using leather fillers or seeking professional help is recommended.
2. How often should you condition leather?
It’s best to condition leather every 3-6 months, depending on the climate and usage. Frequent conditioning helps maintain its softness and prevents cracking.
3. What’s the best oil for leather care?
Olive oil, coconut oil, and mink oil are popular choices for conditioning leather. However, specialized leather conditioners are often more effective.
4. Can deep scratches on leather be repaired?
Yes, deep scratches can be repaired using leather fillers, dyes, and a leather repair kit. However, severe cases may require professional services.
5. How do you prevent leather from cracking?
Regular conditioning, avoiding direct sunlight, and proper storage are key to preventing leather from cracking. Using a leather protector spray also helps maintain its durability.
FAQ : Frequently Asked Questions
How to Fix Scratches and Marks on Leather: A Simple Guide
Answer:
Yes, minor scratches can be fixed at home using oils, conditioners, or leather repair kits. For deeper scratches, using leather fillers or seeking professional help is recommended.
Answer:
Yes, deep scratches can be repaired using leather fillers, dyes, and a leather repair kit. However, severe cases may require professional services.
Answer:
You can gently rub the scratched area with a soft cloth and a small amount of leather conditioner. For deeper scratches, you may need a specialized leather repair kit.
Answer:
Yes, you can use a small amount of coconut oil or olive oil as a natural conditioner. However, test it on a hidden area first to ensure it doesn’t darken the leather.
Answer:
Ink stains can be tricky, but you can try using rubbing alcohol on a cotton swab. Gently dab the stained area, being careful not to rub it into the leather.
Answer:
Regular conditioning, avoiding direct sunlight, and proper storage are key to preventing leather from cracking. Avoid exposing the wallet to extreme temperatures. Using a leather protector spray also helps maintain its durability.
Answer:
It’s best to condition leather every 3-6 months, depending on the climate and usage. Frequent conditioning helps maintain its softness and prevents cracking.
Answer:
Olive oil, coconut oil, and mink oil are popular choices for conditioning leather. However, specialized leather conditioners are often more effective..
Answer:
Look for a high-quality, natural leather conditioner that restores moisture without leaving a greasy residue. Some popular brands include Leather Honey and Chamberlain’s Leather Milk.
Answer:
Use a leather cleaner and a soft-bristled brush for stubborn stains. For grease stains, try sprinkling a bit of cornstarch and letting it sit overnight.
Answer:
If your leather wallet starts to smell, air it out in a cool, dry place. You can also use leather-specific deodorizers or put a small sachet of baking soda inside to absorb odors.
Answer:
To prevent water stains, apply a leather protector spray and avoid exposing your leather items to moisture whenever possible.
Answer:
Prevent fading by storing your leather items away from direct sunlight, which can cause discoloration. Use a leather conditioner with UV protection to help maintain the color and vibrancy of your luxury leather goods.
Answer:
It’s best to avoid using soap and water, as they can damage the leather. Instead, use a cleaner specifically designed for leather.
Answer:
While vinegar can be used in small amounts to clean leather, it should be diluted with water to avoid damaging the leather. Always test in an inconspicuous area first.
Answer:
Regular cleaning and conditioning will keep your leather wallet looking its best. You can also use a leather protector to minimize dirt and stains.
Answer:
If your leather bag gets wet, blot it immediately with a dry cloth and allow it to air dry naturally. Avoid using direct heat sources.
Answer:
Musty odors in leather bags are often caused by moisture. Air out the bag in a well-ventilated area. Place a small sachet of baking soda or activated charcoal inside to absorb the smell. Proper leather storage can also prevent odor buildup.
Answer:
Suede leather requires a different cleaning approach. Use a suede-specific cleaner and brush to maintain its texture.
Answer:
To keep your leather goods looking new, clean them regularly, condition them every few months, and store them properly. Avoid exposure to extreme temperatures, direct sunlight, and excessive moisture. Proper leather care ensures your luxury items retain their appeal and last for years.
Answer:
One of the finest aspects of full-grain leather is its ability to tell a story through use. With each touch and use, the leather becomes softer, and its natural oils enhance the color and texture, developing a one-of-a-kind patina that reflects its journey with you.

ALTANZ
ALTANZ is a premium leather goods brand focused on timeless design, quality craftsmanship, and everyday functionality. Explore our collection of leather wallets and accessories designed to age beautifully over time.